28
RU
6-7
6-5
Refre shergic W ool
6-6
6-7
6-5
Refre shergic W ool
6-6
10. Установка
10.7 Подключение для подачи водопроводной
воды
Убедитесь, что уплотнители вставлены.
1. Подсоедините наливной шланг изогнутым кон-
цом к машине (Рис. 10-10). Затяните винтовое
соединение вручную.
2. Другой конец наливного шланга подсоедините к
крану подачи воды с резьбой 3/4 дюйма (Рис. 10-11).
Примечание: система защиты от протечки воды «Аквастоп»
Некоторые модели комплектуются наливным шлангом с системой защиты от
протечки воды – «Аквастоп» (B). Система «Аквастоп» защищает имущество поль-
зователя от повреждений, вызванных водой, автоматически отключая подачу во-
допроводной воды в случае повреждения наливного шланга. На срабатывание
защиты указывает красный индикатор (C). Такой шланг необходимо заменить.
10.8 Подключение к сети электропитания
Перед каждым подключением проверяйте следу-
ющее:
►источник питания, розетка и предохранитель со-
ответствуют требованиям, указанным на завод-
ской табличке.
►розетка заземлена, многоместные разветвители
или удлинители не используются.
►вилка и розетка строго соответствуют друг другу.
Вставьте вилку электрошнура в розетку (Рис. 10-12).
ВНИМАНИЕ!
►Следите за тем, чтобы все соединения (шланг электропитания, слива и пода-
чи воды) были плотно затянутыми, сухими и не имели утечек!
►Следите за тем, чтобы эти части никогда не были сдавлены, перегнуты или
скручены.
►Если шнур электропитания поврежден, то во избежание опасности его необ-
ходимо заменить. Эта работа должна выполняться сервисным агентом (см.
гарантийный талон).
Примечание: программа «Гигиена»
Перед первой стиркой после установки или после длительного неиспользова-
ния рекомендуется выполнить действия по профилактическому уходу, запустив
программу «Гигиена» без белья и с небольшим количеством моющего средства
в отсеке (2) контейнера или со специальным очистителем для удаления потенци-
ально вредных веществ и мусора.
10-Installation
28
10.8 Electrical Connection
Before each connection check if:
▶power supply, socket and fusing are appropriate to
the rating plate.
▶the power socket is earthed and no multi-plug or
extension are used.
▶the power plug and socket are strictly according.
Put the plug into the socket (Fig. 10-12).
WARNING!
▶
dry and leack free!
▶Take care these parts are never to be crushed, kinked, or twisted.
▶If the supply cord is damaged, it must be replaced by the service agent (see warranty
card) in order to avoid a hazard.
Note: Hygiene
-
nance run programme HYGIENE with no load and small amount of detergent in wash-
ing agent compartment (2) or with special machine cleaner to remove possibly corrup-
tive residues.
10-12
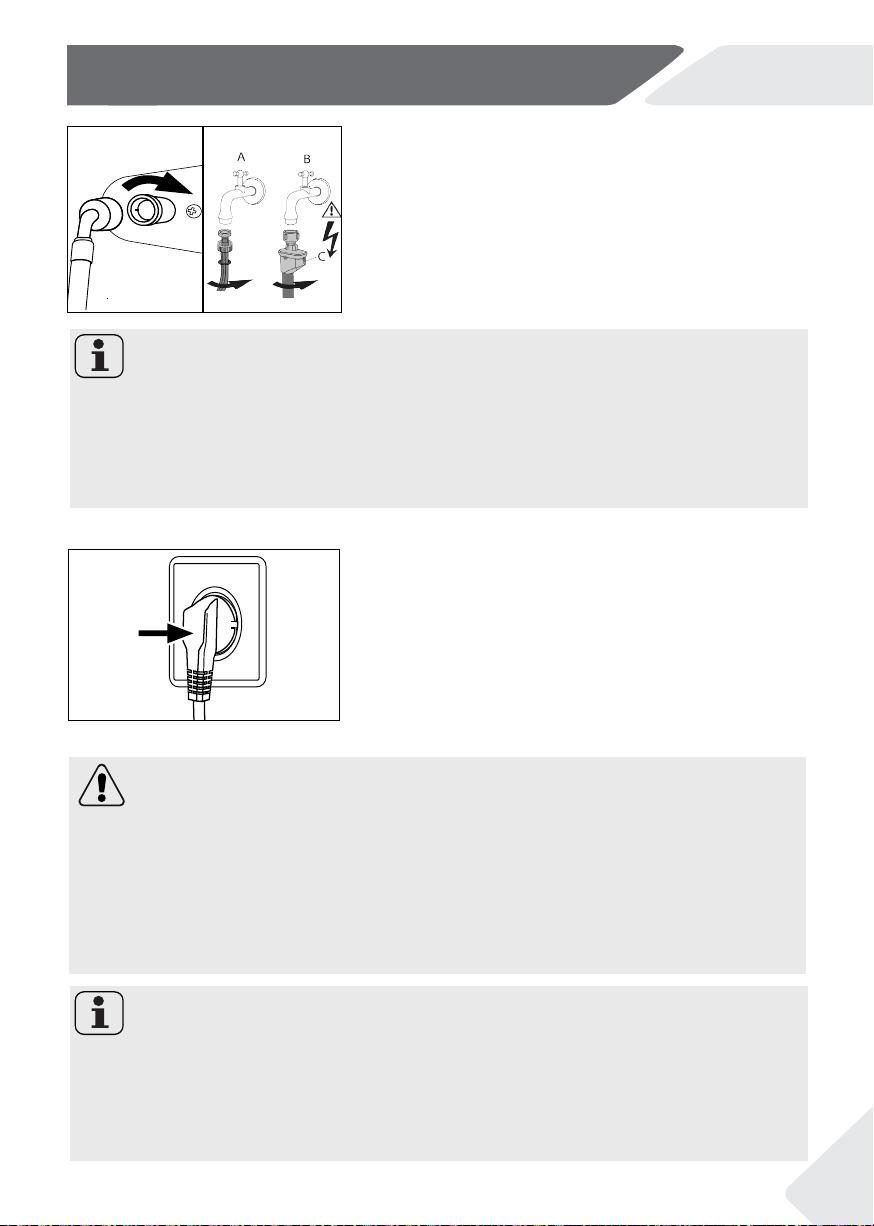
10.7 Fresh Water Connection
10-1110-10
Make sure that the gaskets are inserted.
1. Connect the water inlet hose with the angled end
to the appliance (Fig. 10-10). Tighten the screw
joint by hand.
2. The other end connect to a water tap with a 3/4“
thread (Fig. 10-11).
Note: Aqua-stop-system:
Some models are equipped with an aqua-stop inlet hose (B).The aqua-stop system
protects against water damage by automatically cutting the fresh water supply in case
of a leaking hose. This is indicated by a red marker (C). The hose must be replaced.
GB
10-Installation
28
10.8 Electrical Connection
Before each connection check if:
▶power supply, socket and fusing are appropriate to
the rating plate.
▶the power socket is earthed and no multi-plug or
extension are used.
▶the power plug and socket are strictly according.
Put the plug into the socket (Fig. 10-12).
WARNING!
▶
dry and leack free!
▶Take care these parts are never to be crushed, kinked, or twisted.
▶If the supply cord is damaged, it must be replaced by the service agent (see warranty
card) in order to avoid a hazard.
Note: Hygiene
-
nance run programme HYGIENE with no load and small amount of detergent in wash-
ing agent compartment (2) or with special machine cleaner to remove possibly corrup-
tive residues.
10-12
10.7 Fresh Water Connection
10-1110-10
Make sure that the gaskets are inserted.
1. Connect the water inlet hose with the angled end
to the appliance (Fig. 10-10). Tighten the screw
joint by hand.
2. The other end connect to a water tap with a 3/4“
thread (Fig. 10-11).
Note: Aqua-stop-system:
Some models are equipped with an aqua-stop inlet hose (B).The aqua-stop system
protects against water damage by automatically cutting the fresh water supply in case
of a leaking hose. This is indicated by a red marker (C). The hose must be replaced.
GB
 Haier HW80-BP14969B
  Haier HW30-BP7407
  Haier HW60-BP10959A
  Haier HWD100-BD1499U1
  Haier HW60-BP12758
  Haier HW80-B14979S
  Haier HW60-BP12929BE
  Haier HW70-BP12758S
  Haier HWQ90B416FWB
  Haier HW70-BP1439G
  Haier HW70-BP12959DE
  Haier HW60-BP10929A
  Haier HW70-BP12919
  Haier RTXS G382TM/1-07
  Haier HW60-BP12919A
  Haier HW70-BP12969A
  Haier HW60-BP12929AE
  Haier HW60-BP12929BS
  Haier HW60-BP12959BSE
  Haier HWD120-BD14378
Добавить комментарий